Installation
Sold Separately Components & Tools
- Drok Voltmeter
- L6-30 Industrial Receptacle
- Power Cord, 15ft, 10/3, 30A/250V
- 5-20 Residential Receptacle
- Power Cord, 6ft, 14 AWG, 15A/125V
- Power Cord, 5ft, 12/3, 20A/230V
- 18AWG Copper Electrical Wire
- Precision Screwdriver Set
- Wire Stripping Tool
- 10-Inch Aviation Tin Snips
Step-By-Step Installation Guide
Disclaimer - I am not an expert nor do I claim to be an expert. This is not electrical advice, please do your own research before continuing. Everything said is from my point of view and for entertainment purposes only, please continue with caution and consult a professional to confirm what will work for your setup and electrical needs. Any damages or injuries are the reasonability of you, the purchaser, The Meter Box and it's associates are released of all liability during use of our product or installation.
In no event shall our company be liable for any direct, indirect, punitive, incidental, special consequential damages, to property or life, whatsoever arising out of or connected with the use or misuse of our products.
Step 1.) Snap the voltmeter into position by feeding the electrical donut through and sliding into place until each side connects, you will hear it click into place. When looking at the lid with the voltmeter installed there should be a small black reset button positioned on the right side of the voltmeter, this will tell you that you have the orientation correct.


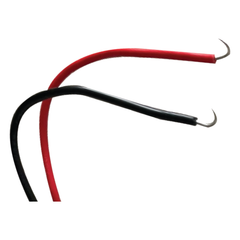
Step 2.) Using the recommended 18awg solid copper wire, cut it to 6" in length, stripping each end of the wire. Repeat this process so you have two identical wires, in my case I had a red wire and black wire as shown.
Connect each of the wires from the previous step into the terminal on the side of voltmeter as shown, bend the other end of the wire into a "J" shape - this end of the wire will be connected to the L6-30 industrial plug terminals.

Step 3.) Now that the meter is ready for connecting, lets bring the main power line in! As you would with any electrical line prior to working on it, be sure to turn off the breaker associated with the line and test that is in fact off for safe handling. Once safe to use, strip the ends of the connection and make a "J" shape on each of the ends of the wires to be connected to the L6-30.

Step 4.) Once finished, you should be ready to connect the main power line as well as the voltmeter to the electrical plug, please see the example below to show the configuration of our wire setup. If you have something different please consult a professional for further advice.

Step 5.) After you have connected the wires accordingly and ensured they will not move, place the L6-30 industrial plug into it's location on the lid and secure using the included nuts and bolts.
At this point you should have the voltmeter snapped into place, L6-30 plug secured using the nuts and bolts provided and everything wired correctly. Prior to closing the lid and securing it with the including screws, if you would like to have the case mounted there are holes for that positioned either on the back of the case or either, complete that now.

Step 6.) Once the case is mounted where you would like it, now it's time to secure the lid to the case using the included screws. Fit the lid and case together and using either a drill or screwdriver fasten each screw until flush, complete this in each corner. After the lid has been connected to the case you may now turn the breaker back on, plug in your mining rig or power distribution unit and watch as you see your electrical usage in live time!